Whatcha lookin' for?...

Thursday, December 6, 2012

emeals my new addiction

I have a new addiction. emeals by Dave Ramsey. Not only am I saving money on the food I buy, I'm saving time. I'm saving those precious minutes, or more accurately hours I spend on my days off planning out dinners and grocery list for Dan and myself. And I love it. 

SAVE TIME AND MONEY WITH EMEALS MEAL PLANS
I took advantage of it on cyber monday and got 30% off the program for a year. Best Christmas gift too myself ever! The food is delicious and simple and I cant help but pat myself on the back because food no longer goes to waste with my "feeding an army" cooking mentality. So I am spending less, wasting less and stressing less about whats for dinner. Over the next few days I will be posting some of the meals from emeals just so everyone else can experience how good it is! I'm following the natural and organic meal plan for two. this weeks groceries cost me $83.38 for seven meals, that's $11.91a night for seven dinners..cheaper and healthier than that crappy pizza I was going to order!

Sunday, September 9, 2012

Orange Marmalade: Part 2

 So just in case you missed part one of this FANTASTIC orange marmalade tutorial feel free to go to Orange Marmalade:Part 1.

 So we have now practiced patience and waited 22 hours before continuing to make our item at hand. Yes I know the recipe only calls for 12-18 hours of waiting but hey, some of us have to work and cannot always follow the rules. Now what we want to do is quick boil the mixture of orange pulp, peel, lemon and water until the peels are tender. You can tell when they are tender by mushing them with the spoon you are using to  mix with.

 Now it is time to dirty yet ANOTHER pot and add equal amounts of sugar to your citrus mixture. I had 8 cups of mixture so I added 8 cups of sugar! Simple math makes me happy!
Measuring a cup at a time into my 8qt stockpot
Add equal amounts of sugar or whatever sweetener you choose
 Next, over high heat bring the sugar-citrus mixture to a boil and stir constantly. Cook until it is almost at a gelling point(if you want put some spoons in the freezer and once they are cold check for a gel by letting some marmalade cool on the spoon and seeing how solid it gets after a minute). Once you reach that point remove the mixture from the heat and start jarring it up!

Lids and rings softening
Jars sterilized
CAUTION: JARS AND MARMALADE EXTREMELY HOT
Now if you are going to process the jars to preserve all your hard-work go ahead and add the lids and bands for mason jars or gaskets and clamps to Weck jars. Put the jar back into the boiling hot water bath and let boil for 10-12 minutes. Remove, let cool then check to make sure all your jars have sealed!

My finished product! Ain't it pretty?!
Do you see the tongue?! The jar sealed right.

Jars processing in hot water bath
After ALL this I only had one jar not seal because the rubber gasket ripped. With the Weck jars you will know if they sealed properly by the little pink tongue pointing down. I came out with a total of:5 4oz jars, 3 8oz jars and 3 12.5oz jars...that is a lot of marmalade.

Saturday, September 8, 2012

Orange Marmalade: Part 1

While Perusing my Copy of The Pioneer Woman:Food From My Frontier I came across a recipe for Orange Sweet Rolls, one of my lovey Daniel's favorite breakfast treats. And of course the only ingredient that is not readily available on my shelves is orange marmalade. So instead of heading down to the grocery store I decided to just not make them until the orange sticky goodness found its way miraculously onto my shelves on its own, lord only knows I won't buy it I could care less for the stuff. And then as an act of fate Dan brings home oranges. So I get out the canning gear and decide that I shall make my very own orange marmalade and at some point this week make him orange sweet rolls. 

Welcome to part one of this canning adventure, I decided to keep it simple and follow the Ball Blue Book Guide to Preserving  recipe for orange marmalade and since it is a two part recipe what better to do than write a two part blog!

Ingredient List:
2 cups thinly sliced orange peel
1 quart chopped orange pulp
1 cup thinly sliced and seeded lemon
1 1/2 quarts water 
sugar


So I took my freshly cut up oranges and peeled the peel off to separate peel from flesh.


Then I sliced up the fleshy pulp into small pieces (some not so small since I am feeling lazy)and filled my 2 quart sauce pan half way since the recipe calls for "1 quart chopped orange pulp". 


Now is the fun part, I got to be the "noisy destroyer" and dig out my crappy food processor, fit it with the grater blade and throw the orange peel in it to mince the peel instead of taking the time to thinly slice.


Totally Looks Like Egg Yolk!

Now go ahead and slice your lemon and take out those pesky little seeds!

Combine everything in a larger than 2 quart sauce pot (note the switch to the 4 quart soup pot)and add 1 1/2 quarts water or the equivalent 6 cups of water and bring to a simmer. Let simmer for 5 minutes. Now go ahead and cover it and let stand in a cool place for 12 to 18 hours! Then Return tomorrow for the rest of the instructions!

Saturday, July 14, 2012

Whole Wheat Scones Made With Rainer Cherries

So I'll admit I've been craving these scones all week but dreading making them because well I Hate Breakfast. I am a breakfast hater. And then once I finally made them, I wished I would have made them without the wheat flour. Don't get me wrong, they still tasted good but I wanted fluffier less dense scones. But here goes the recipe, feel free to substitute the whole wheat flour for all purpose flour.


Ingredients:
1 1/2 cups all-purpose flour
1 1/2 cups whole wheat flour
1/3 cup sugar
1 tablespoon baking powder
1/2 teaspoon baking soda
1/2 teaspoon salt
3/4 cups chilled and cubed butter (1 1/2 sticks)
1 cup buttermilk
1 cup pitted and halved cherries(If you want you can freeze them to keep them from bursting in the dough)
3 tablespoons melted butter
1 tablespoon coarse cane sugar


1. First things first, wash and cut your cherries and freeze them if that is what you want to do, I decided not to because the Rainier cherries aren't super juicy but if i was using Bing cherries I would have.


2.Preheat oven to 375 Degrees Fahrenheit


3. In a large bowl whisk together flours, sugar, baking powder, baking soda and salt.


4.Now cut in your butter, I just used two knives in a back an forth motion (think hand bars on an elliptical machine how the go back and forth at opposite times)but if you have a pastry blender by all means use it. Mix until your dough looks like a coarse meal with plenty of small chunks of butter in it


5.Make an impression in the middle of your dough and pour the buttermilk in. 


Buttermilk I know its blurry... Sorry!
6.Now continue mixing with your knives or pastry blender until the dough forms a crumbly ball. The dough will still be somewhat dry so don't worry


7. Go ahead and transfer your dough to a space where you can knead it and shape it into a large rectangle. Press your cherries into the dough and try to get some fully covered.


8.Now you can cut your dough into four equal rectangles and than cut each rectangle on the diagonal to get pretty little scones.I personally did not do this because well i just wanted to eat, having it look pretty didn't matter because once again I hate breakfast.


9 Place scones on a lightly greased baking sheet(I couldn't find mine hence the pan)lightly butter the tops with the melted butter and sprinkle with the sugar to get a crunchy crusty top. 


10.Now you can chill your dough in the freezer for 5-7 minutes to help it keep its shape or be lazy and skip this step and go directly to step 11.


11.Bake for 20 minutes or until golden brown, remove from oven and enjoy while warm with some homemade jam!


feel free to substitute the cherries for any other type of fruit, hell I was half tempted to just use frozen strawberries this morning so I didn't have to pit the cherries but I talked Dan into prepping the cherries for me so I stuck with them.


Saturday, July 7, 2012

Raw packed cherries in simple syrup

The tastiest thing I've decided to add to my zombie apocalypse bomb shelter all summer!

So tonight I decided to raw pack a few pounds of cherries I picked up dirt cheap at work. Rainer cherries were on sale this week and I got about 5 pounds for $10! Now I love my cherries in the summer but what about that sad dreary time in the winter, I can only stuff sooo many apples down my throat.


Ingredients:
2 pounds fresh Rainer cherries pitted
2 cups of sugar
4 cups water
2 vanilla beans cut into small strips
And jars, I used 5 Weck 12.5 oz jars


First off if you haven't done it already clean and pit your cherries. You can use a fancy cherry pitter or if your a broke 23 year old like myself, you can just jab those little pits right on out with a straw!

Now you want to make sure you sterilize your jars and lids and in my case seals. Boil your many small components and keep them warm! We wouldn't want those precious jars to burst when we pour the warm simple syrup in!

Now while you wait for the jars to boil feel free to start making your simple syrup. In a small sauce pan over medium heat warm your sugar and water to a gentle boil stirring occasionally. You want the sugar to completely dissolve or you will have sugar crystals form in your jars after you are done processing everything. also now is a good time to cut up your vanilla beans.

Next take your freshly sterilized jars and fill them with the cherries. Make sure to leave enough space in the jar for your liquid to fully cover the cherries AND have room to expand. Now go ahead and add a strip of vanilla bean, pour in your syrup and attach the lid. 


Begin your hot water bath and process for 15 minutes.


Remove the jars from water place on cooling rack and allow to cool down. Check to make sure the jars are sealed and now marvel at how easy that was, along with how delectable those beautiful cherries look!


Go ahead and eat some now, but more importantly save some for later on when you miss that taste of summer! Plus the vanilla bean will enhance the flavor as time goes on the longer you wait the better!

Sunday, January 29, 2012

Baked duck ravioli

So I decided to start by being ambitious and attempting to make duck raviolis. Let me start by saying I've never cooked duck before and i've only made egg noodle pasta dough for ravioli. But seeing as I'm the ambitious type I figured what the hell might as well try it, the ducks are in the fridge and I'd love an excuse to use my kitchen aid.

I don't have a clue what I'm doing with this blog so bare with me, I promise it will get better as I go...

Ingredients:
For the filling
2 ducks
8 leaves of fresh basil
2 1/2 tablespoons goat chèvre
2 tablespoons dried cherries

For the pasta
Semolina flour
Salt
Water
Olive oil

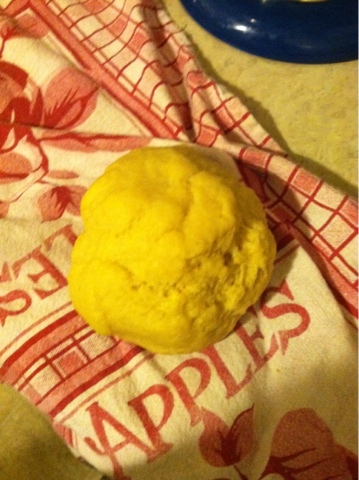
So first off I made the pasta dough by simply mixing everything together in my kitchen aid then kneading by hand for ten minutes till the dough became very elastic in consistency. I wrapped the dough in a towel and let it sit for about 20 minutes.

While this was happening I removed the heads and skin from my ducks and deboned them so that all I had left was meat I came out with about 2/3 cup of meat and chopped it into fairly big chunks before mixing with the other ingredients. After I made my mixture I realized my twenty minute dough resting time had elapsed and made my lasagna sheets by rolling the dough out on the counter and counting thin strips. Trust me this process is much easier and faster with a pasta press and ravioli mold! But back to what I was saying I made my little squares and laid them out to be filled.

I took my duck mixture, ran it through my meat grinder and put about a teaspoon of filling in the middle if my square pasta sheets. Then I placed another sheet on top brushed the edges with water and pinched them shut. Now here I got a little crazy and had the best kitchen assistant ever cut pretty edges cuz we gotta have it look professional! And after I finished each ravioli I baked them for about 15 minutes at 375.

Then we devoured them.

Saturday, January 28, 2012

Good old-fashioned down home cooking

So I was thinking that my blog should become much more food related because in a perfect world I would not be working in a grocery store but I would be cooking in my own family style restaurant. Making the food that I love without all the fillers and added unnecessary crap that you get at a lot of places today. It would be treated as an extension to my kitchen feeding people the way that I love too with healthful, hearty, scrumptious meals!